


Before we get started, I’d like to say that I drew heavily from the concepts I learned in Starting Strength to create this material. While Starting Strength
is not a book about powerlifting, it contains more than 300 pages of biomechanical analysis directly relevant to the powerlifts. If you grasp this knowledge, you will begin to develop your own ideas about optimal technique based on physics. I can’t recommend Starting Strength
more strongly.
Executing an efficient deadlift is infinitely simpler than justifying what efficient technique actually is. If you’ve been following along with the deadlift article series thus far, you already know the following things:
1) The bar must start over mid-foot
2) The shoulders must start slightly in front of the bar (to establish the 90 degree angle between the lats and the humerus)
3) The hips must start relatively high in order to facilitate both 1) and 2)
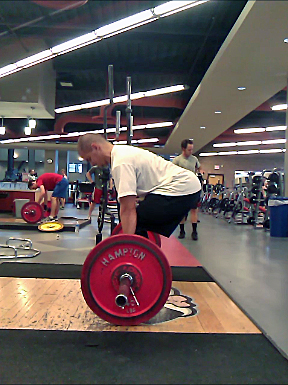
Scapula, bar, and mid-foot are all in vertical alignment in the proper deadlift starting position.
If you find yourself shaking your head in disagreement, make sure you check out Part VI and Part VII where the scientific explanation for the necessity of all of the above three points is given.
Technique is often better shown than discussed. If you prefer video to reading, make sure to check out our “How To” deadlift video below:
Deadlift Set-up
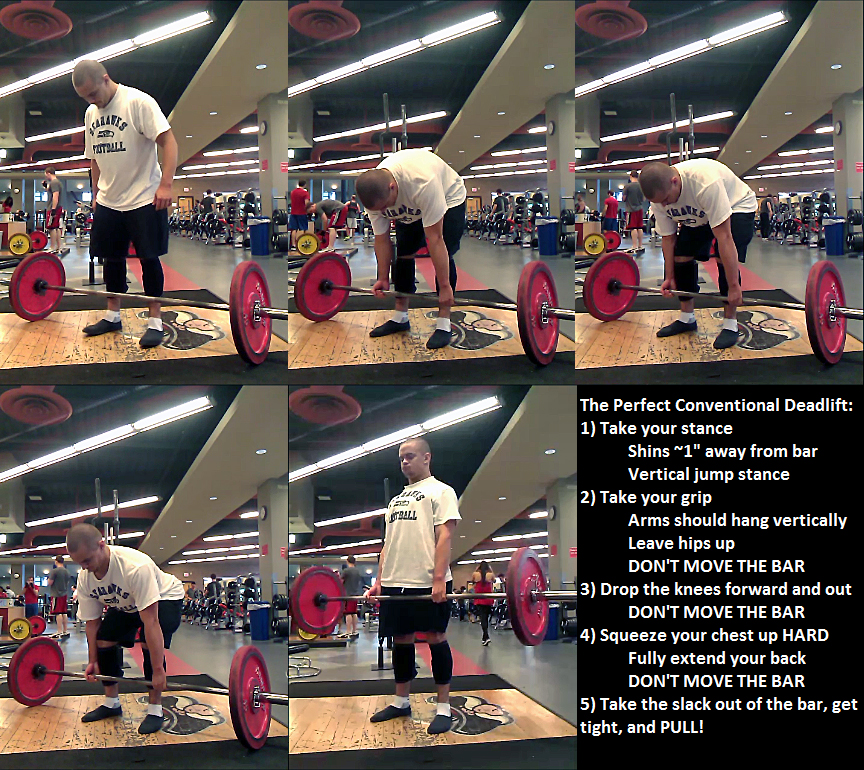
Borrowing from Coach Mark Rippetoe, here is how to pull the perfect conventional deadlift set-up every single time:
1. Take your stance, feet a little closer than you think they need to be and with your toes out more than you like. Your shins should be about one inch from the bar, no more. This places the bar over the mid-foot – the whole foot, not the mid-instep.
2. Take your grip on the bar, leaving your hips up. DO NOT MOVE THE BAR.
3. Drop your knees forward and out until your shins touch the bar. DO NOT MOVE THE BAR.
4. Hard part: squeeze your chest up as hard as you can. DO NOT MOVE THE BAR. This establishes a “wave” of extension that goes all the way down to the lumbar, and sets the back angle from the top down. DO NOT LOWER YOUR HIPS – LIFT THE CHEST TO SET THE BACK ANGLE.
5. Squeeze the bar off the floor and drag it up your legs in contact with your skin/sweats until it locks out at the top. If you have done the above sequence precisely as described, the bar will come off the ground in a perfectly vertical path. All the slack will have come out of the arms and hamstrings in step 4, the bar will not jerk off the ground, and your back will be in good extension. You will perceive that your hips are too high, but if you have completed step 4 correctly, the scapulas, bar, and mid-foot will be in vertical alignment and the pull will be perfect. The pull will seem “shorter” this way.
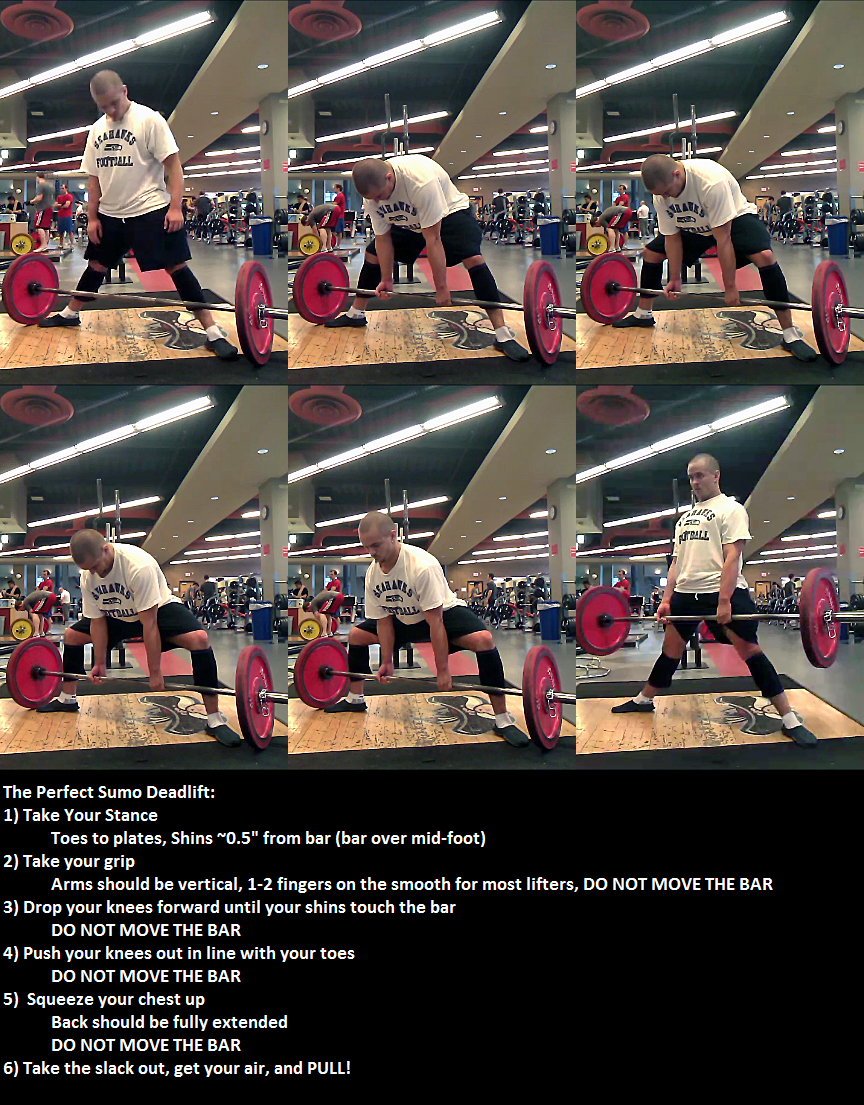
Now, I’m sure you’re wondering, “But what about sumo”? Yes, in fact, sumo is just a tiny bit more complicated. For sumo, we need to add an additional step between Steps 4) and 5) and we need to add a final step at the end as well.
The interim step, between steps 4 and 5, is incredibly simple: push your knees out in line with your toes! DO NOT DROP YOUR HIPS. DO NOT MOVE THE BAR. Push the knees OUT in line with the toes without changing any other part of the set-up. Yes, that is it. That’s all you have to do different in terms of sumo set-up.
Deadlift Back Angle
When most people think of sumo deadlifts, they think of a vertical back angle. If you actually analyze a variety of HEAVY sumo pulls from the floor, from the best lifters to novices, you’ll notice that the back is more vertical than a conventional pull, but it is not necessarily upright.
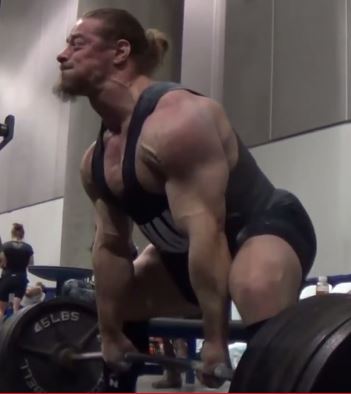
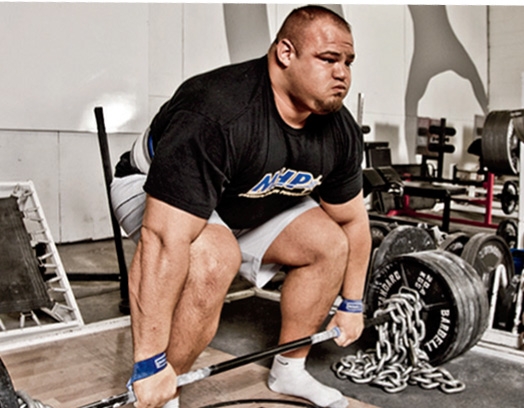
World Record Holder Dan Green’s back angle is very far from vertical here. Photo: Dan’s YouTube Channel
The back may go from a 20 to 30 degree angle in the conventional deadlift to something closer to a 30 to 45 degree angle with the sumo style depending on your anthropometry. Almost no one will present a back angle remotely similar to a squat. Only lifters with long torsos, short femurs, and relatively long arms will have anything resembling an extremely upright sumo starting position.
Do not worry about this. We want high hips. Remember, so long as the scapula, bar, and mid-foot stay in vertical alignment, the pull has been set-up correctly and our leverages have been maximized.
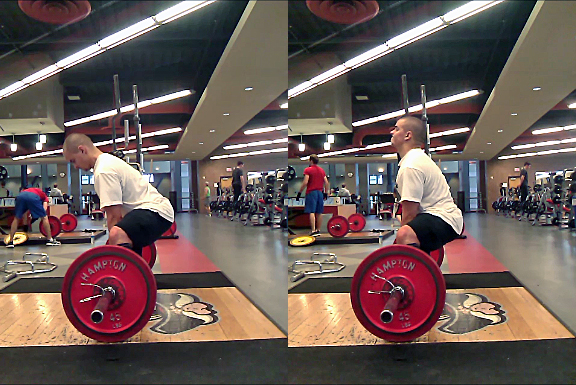
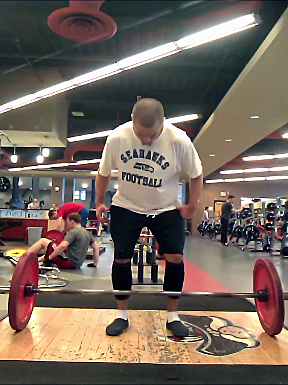
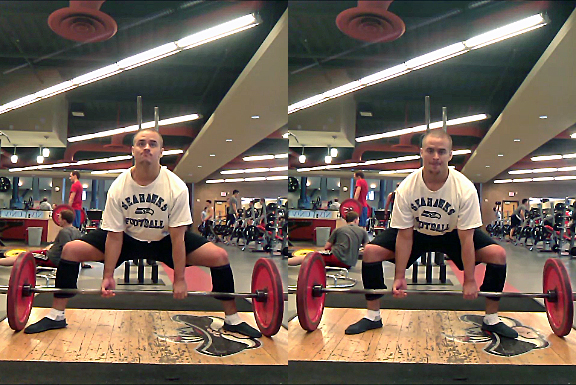
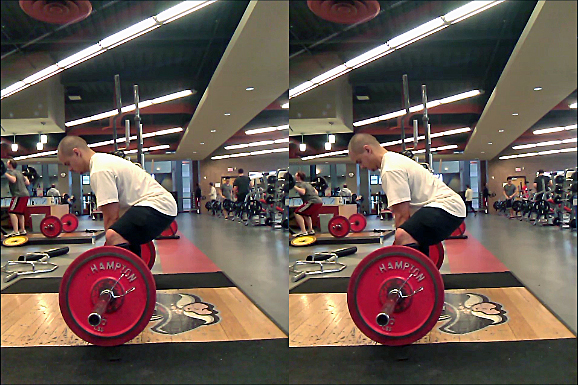
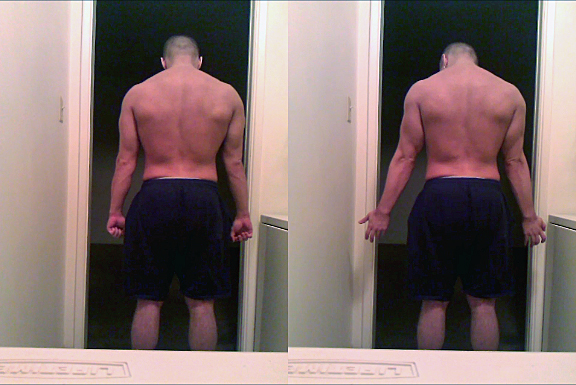
Most people THINK their sumo deadlift starting position should be closer to the picture on the right. In reality, most people will be even more bent over than I am in the left picture (I have long arms and good flexibility).
Deadlift Knee Position
If you do not hold your knees out, you defeat the purpose of pulling sumo for the most part. Remember, the reason that sumo works is because we effectively shorten the length of the thigh segment by holding the thigh at an angle.
When you fail to keep the femurs held in external rotation, and the knees collapse in, the legs are held at less of an angle, the back folds over more, and what you’ve essentially got is a wide stance conventional deadlift. You’ve barely shortened the moment arm between the hips and the bar, which is the primary advantage of sumo, but you still have all the disadvantages that come along with the wider stance. Namely, your hip angle and knee angle are more closed.
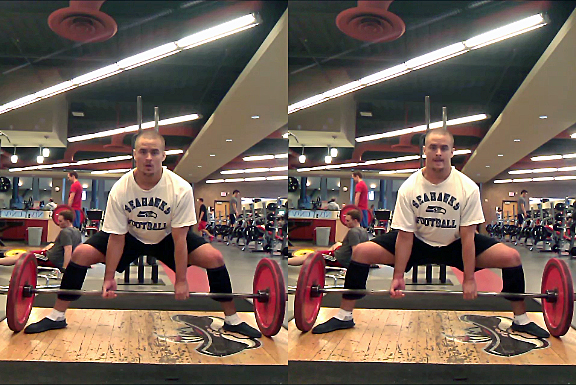
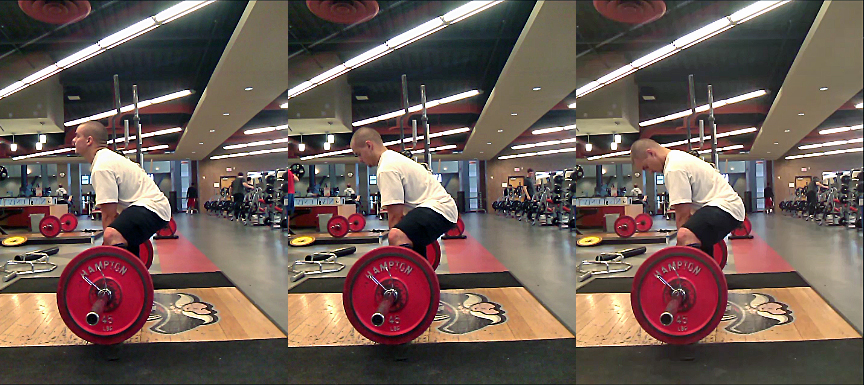
When your knees are not pushed out (left), your hips are further away from the bar and your back angle is more horizontal. Compare the position to the one on the right. Get your knees out.
Frankly, this is one huge reason why most people do not experience the benefits of the sumo pull. They simply cannot open their hips adequately. If you cannot get your knees out, due to your hip mobility, hip anatomy, or adductor flexibility, you will simply not incur the biomechanical advantages potentially afforded by the stance.
In my opinion, this is why bigger athletes generally do not excel with the sumo deadlift. Even the heavyweights who pull sumo tend to do so because they’ve gotten too large to perform the conventional deadlift correctly. Most larger athletes have poor mobility. This directly translates to reduced sumo poundages.
If you cannot hold your knees out, you shouldn’t expect optimal sumo performance.
Deadlift Grip Width
If you want to maximize your efficiency in the deadlift, nearly all of your technique should revolve around making the arms as long as possible relative to your other segments. At the end of the day, arm length is the number one determinant of leverage in a deadlift.
The very last thing you want to do is a take a grip width that results in non-vertical arms unless it is absolutely necessary. When the arms hang at an angle, they are effectively shortened.

A wide grip (left) adds two inches of RoM to the bottom AND the top of the pull. Do you pull more from a 2″ deficit or from the floor? Pull with straight arms.
Shorter arms are a bit of a double whammy. They make both the lockout AND the starting position harder. You need to limit this by taking as vertical of a grip as your build will allow. For you conventional pullers out there, if you’re a relatively bigger person, you’re almost always going to have to compromise here somewhat. You need to make room for your legs and stomach inside of your arms. This necessitates a somewhat wider grip.
World’s Strongest Man Brian Shaw is 6’8″, 400lbs+. His large frame necessitates a wider stance and a wider grip to make room for legs and gut. Photo: flexonline.com
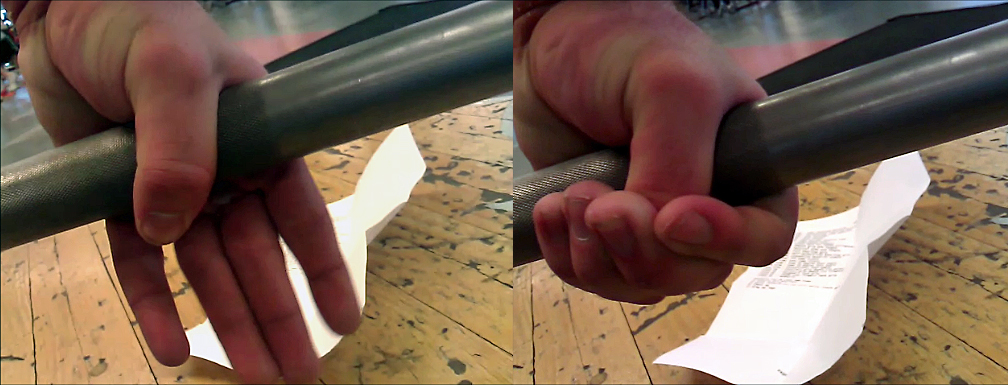
For sumo pullers, there is NO EXCUSE for this grip inefficiency. Most people, in the sumo deadlift, will do best with a grip that actually features 1-2 fingers on the smooth part of the knurling. You’ll have to experiment for yourself and find out exactly where you need to put your hands to ensure a vertical grip.
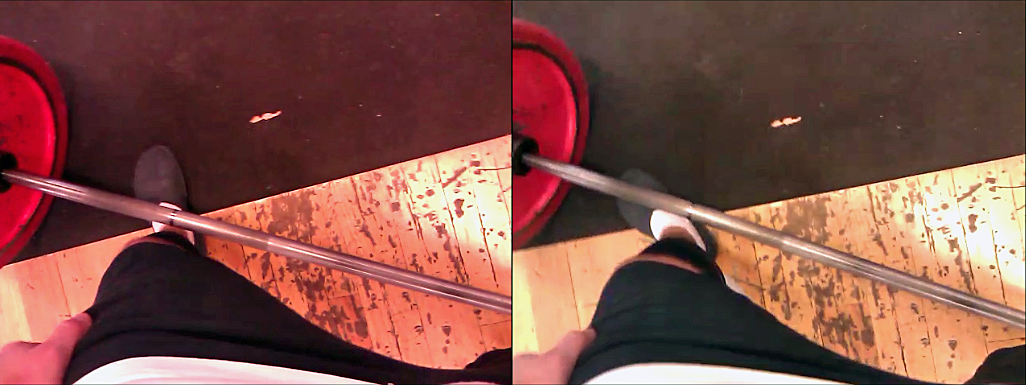
For me, a grip with all fingers on the knurling (right) produces diagonal arms. My arms only hang vertically with two fingers on the smooth (left).
Deadlift Stance Width
With all this in mind, let’s discuss the optimal stance width for both style of pulling.
For the conventional deadlift, it isn’t entirely uncommon to see everything from heels touching (or nearly so) to heels just outside of shoulder width. What is optimal? Well, realistically, the stance width that facilitates vertical arms is optimal. For most athletes, this will be approximately a hip-width stance. A good place to start is to use the exact same stance you would employ for a vertical jump.
However, for bigger athletes, one must be cognizant of the fact that they simply won’t be able to set their back into extension with a narrower stance. Again, they must stand wider to make room for their stomach and legs. They can also consider pulling sumo (if their mobility is adequate) or they can just pull with a round back which is what many heavyweights elect to do.
For sumo pullers, the wider you can effectively stand, the shorter your range of motion and the shorter the moment arm between the bar and the hips. For everyone but the very short, your goal should be to work towards a toes-to-plate (TTP) stance.
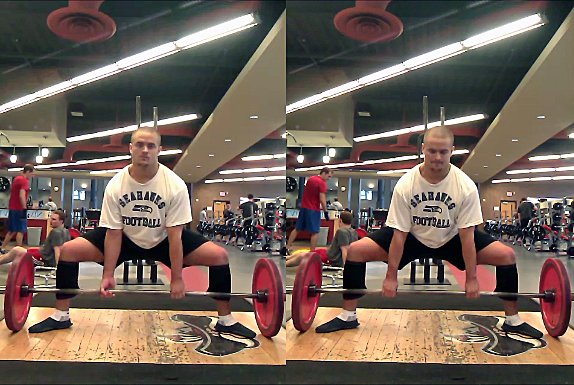
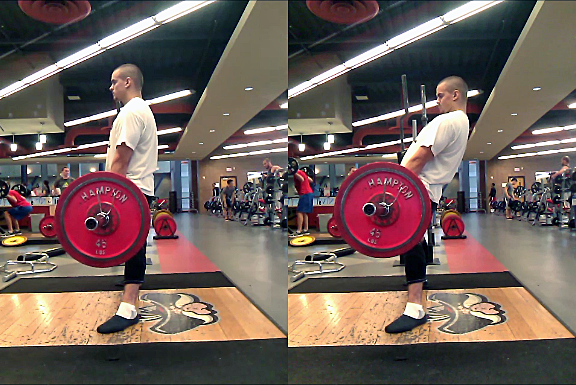
Work your way towards the full toes-to-plate sumo stance (left). Semi-sumo (right) isn’t as efficient.
That said, if you can’t keep your knees out, you’ll need to narrow your stance. Most people who pull on a deadlift bar don’t have the flexibility to use a TTP stance. As with squat stance width, your exact stance width needs to be titrated to your ability to keep your femurs held in external rotation. If you can’t keep your knees out, you’re standing too wide. It is really that simple.
Deadlift Foot Position
People very, very often have questions about what the “optimal” foot position is in the deadlift. There are at least two important considerations: hip “mobility” and, for sumo pullers, adductor flexibility.
You need to be able to fully extend your hips at the top of the deadlift. The less mobile you are, the more external rotation of the foot it will require to achieve full extension at the top of the pull.
Here is a quick test.
Take your deadlift stance. Flex your hips as hard as you can. If you can’t get them all the way through to full extension, your feet aren’t pointed out enough. In fact, you’ll notice that as you push the hips forward to full extension, the feet will tend to want to rotate. If you’ve never done this before, you’ll likely discover that you need your feet pointed out a bit more than you like. This one change alone can clean up a lot of lockout problems.
For sumo pullers, in addition to the need to get full hip extension at the top of the pull, you need to be able to keep your knees in line with your toes. Depending your flexibility, this will require a certain amount of external rotation of the foot. You’ll have to test it for yourself. Remember, the knees must stay out
I recommend that you only turn your foot out as much as you need to in order to achieve good positioning. If you can fully extend your hips at the top and keep your knees in line with your toes, your feet are pointed out enough. Further external rotation will decrease your stability. I have seen many sumo pullers miss pulls at the top because they fell backwards. This can be avoided with a foot angle that is pointed further forwards.
Turn your feet out only as much as you need to in order to keep your knees out and to get your hips through.
Though it is impossible to pin down a precise angle, most conventional deadlifters will be best served with a foot angle somewhere between 10-15 degrees and most sumo pullers will want something more between 30 and 45 degrees depending on exactly how wide they’re standing. Again, you have to experiment just a little bit to find the optimal angle for you personally. Keep those knees out and make sure you can fully extend at the top.

The conventional deadlift foot angle will usually be 10-15 degrees.
Deadlift Head Position
When the head is bent forward, the cervical spine drops into flexion. A flexed spine is not as efficient at transferring force as a rigid one. When the neck is cranked into extension, with perhaps an upward eye gaze, you place the neck in an unsafe position. Hyperextension under a load is not something you want.
Though I don’t believe it ultimately makes a tremendous difference to performance, you should aim to hold a neutral head/neck position throughout a pull. This is often best facilitated by looking at a spot on the floor 10-15ft ahead of you.
Extention (left); Neutral (middle); Flexion (right).
If your head position changes from neutral to extended during the pull, this is generally a sign of inefficiency. Usually, you’ve gotten forward and the body tries to compensate by throwing as much of its mass behind the bar as possible to get you back over mid-foot. If this is happening to you, make sure you are pulling from mid-foot. This error is usually caused by a starting position that features the bar too far forward.
Conventional Deadlift Execution
Frankly, the conventional deadlift is brutally simple. There are few things to worry about execution wise:
a) Hold your back flat (or prevent it from rounding further if you’re a rounded puller)
b) Keep the bar close by dragging it up your shins (do not pull back into the shins; if you draw blood through socks, you might be overemphasizing this)
c) Standing up straight at the top of the pull.
As far as keeping the bar close, you can focus on “packing” the lats during the set-up or on dragging the bar up the shin during the pull. Both have the same effect. If the bar gets away from your shins, you’re increasing the moment arm between the hips and the bar and making the pull way harder than it needs to be.
Loose lats (left) ; “Packed” lats (right).
As for keeping your back position from changing, this really comes down to practicing staying tight.
Lastly, just stand straight up at the top of the pull. Leaning way back at the top, by unlocking the knees and hyperextending the spine, is not only unsafe, but you might actually get red-lighted for it if you unlock your knees too much. Just stand straight up. That’s all you have to do anyways. Leaning back does absolutely nothing for you in terms of further muscular recruitment. You’re literally just putting your spine into hyperextension under a load. This is a terrible, terrible idea. If you do this, stop; stop now.
Not only is hyperextending your back (right) an unnecessary waste of energy, you might actually hurt yourself via pinching in the facet joints. Don’t do this. Just stand up straight.
Sumo Deadlift Execution
Remember, that final step I mentioned that had to be tacked on to Coach Rippetoe’s step-by-step deadlift instructions? Well, in the sumo pull, the knees must be locked out early. In a conventional deadlift, the hips and knees can be locked out at relatively the same time with no harm. In the sumo pull, if you get the bar to lockout height without locking your knees, your legs tend to sag and the pull becomes very hard to finish.
Pay particular attention to the 4th and 5th reps of this set to see this error in action:
As soon as the bar passes your knees, you need to get into the habit of jamming the knees into extension. The sumo lockout should be initiated by full knee extension and only then followed by full hip extension. If you get the knees locked early, the top of the sumo deadlift is nothing more than pushing your hips forward a few inches. This is easy; the leverage is great. If you do this without locking your knees, you’ll shake all over the place and you’ll make the lift much harder than it needs to be. I highly recommend studying the technique of the most sound technical lifter in the game (in my opinion), Andrey Belyaev:
Pulling the “Slack” out of the Bar
Many lifters are often cued to “pull the slack out of the bar” before they initiate their pull. This cue falls somewhere between set-up and execution because it is simultaneously the last thing you do in your set-up and the first thing you do to initiate the pull.
If you pull with a deadlift bar, “pulling the slack out” simply means pulling the bar taut. With enough weight on any bar, it will flex a little bit. If you initiate the pull without taking this “flex” out, some of your initial force is wasted because the bar must first flex that little bit before forced can begin to transfer.
Think of a piece of rope tied to something. The rope won’t tug anything until it becomes taut and thus capable of transferring force. You can pull several feet of rope before anything happens if it is loose enough. The same thing happens in a deadlift. Don’t waste energy. Pull the slack out.

This can often times be barely perceptible so look closely. Slack not taken out (left), slack taken out (right).
Keep in mind that this cue is mostly relevant to those who pull on a deadlift bar, but it useful for everyone to know.
Deadlift Grip Tips and Tricks
Outside of grip width, there are a few tricks you can use to either strength your grip or increase the effective length of your hands (and thus your arms).
First, let’s talk about the mixed grip. Far too many people try to hold the bar deep in their palm. Even when you do this, gravity is still going to pull the bar down into your fingertips. In the process, it will pinch a bunch of skin and destroy your calluses. Just start with the bar in your fingers. This not only avoids unnecessary damage to the hands, but it also increases the effective length of your arms.
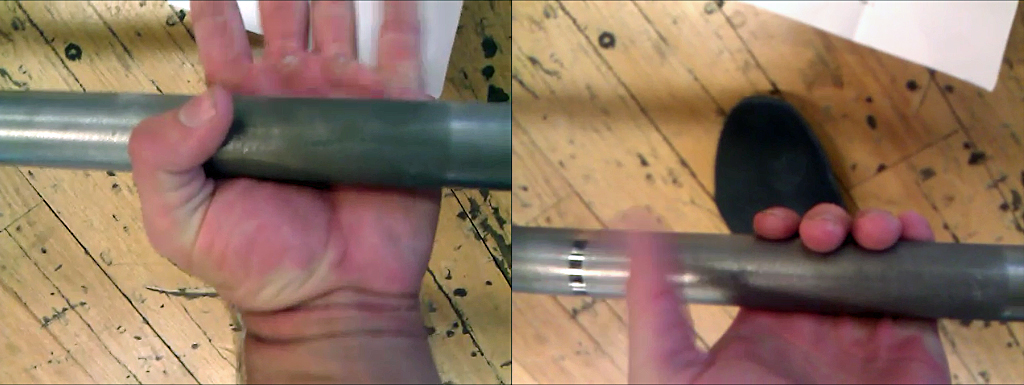
Do not grip the bar deep in your palm (left). Grip the bar at the base of your fingers (right). This is where it will end up in a heavy pull anyways.
Next, consider how you’re locking your grip in. A lot of people overlap their thumb onto their fingers. Usually, this closes the hand. As in the example above, the bar pulls the hand open a bit anyways. The best way to lock your grip in is by setting your thumb across your finger nail(s). Finger nails, particularly when chalked, provide much more friction than skin. This strengthens the grip and allows the bar to sit further down in the hand.
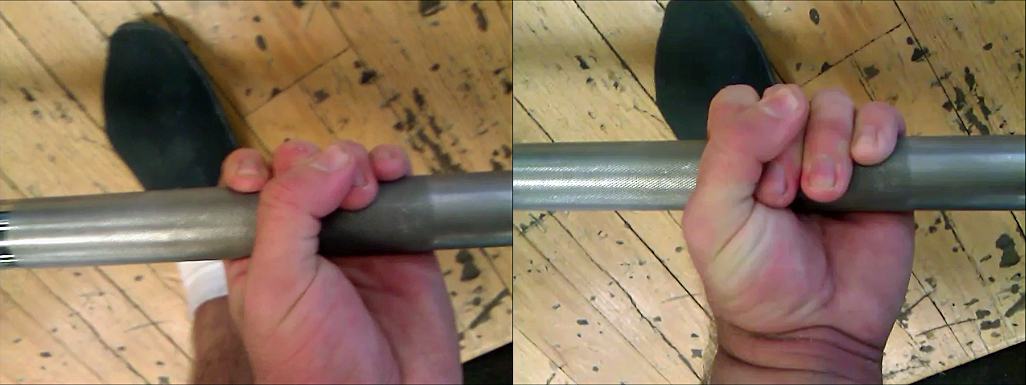
Instead of using a “finger lock” (right), consider using a “nail lock” (left) to secure your grip. Nails provide more friction and the nail lock lets the bar sit further down in the fingers thus increasing the length of your arm.
Deadlift Hook Grip
The last grip consideration is pulling hook grip. I am a huge fan of hook grip and I believe that, if your hands are big enough, it is the best grip to use.
The hook grip, with the thumb inside, prevents the bar from rolling in the fingers.
Not only does hook grip minimize the chances for a bicep tear, but it also prevents a very common problem experienced in mixed grip: unevenness of the bar. When you try to take a narrow mixed grip, your tricep, on the side of the “under” hand, will turn and “run into” your lat. This tends to throw the underhand forward a little. When the bar is more forward on one side than the other, you get all sorts of imbalances and it can throw off the pull.
Usually, lifters resort to just using a wider grip to ensure their arms aren’t rubbing up against their lats excessively. As we already know, a wider grip means shorter arms. Shorter arms mean a smaller pull. Hook grip eliminates all of these issues and allows the bar to sit about as far down in the hand as is possible with a strong grip.
Notice how when the hands are supinated the triceps are pushed into the lats. This causes all sorts of friction and unevenness in the mixed grip pull.
If you have big enough hands, which I’ll define here as anything over 8” from your longest fingertip to the base of your palm, consider pulling hook grip. So long as you don’t have fat, short fingers, you should be able to strengthen it up enough over time that it is the best and most efficient grip for you.
For those with shorter fingers and smaller hands, you’ll have to find other ways to work around the limitations of the mixed grip. Do your best to keep your arms as vertical as possible.
Chalk and Baby Powder
First of all, I hope it goes without saying that you should be using chalk when you deadlift. If you aren’t, you’re making your grip unnecessarily weak for no reason. In powerlifting, lifting chalk is categorically allowed across all federations. Chalk dries out the skin and greatly increases friction. The result is that your grip is greatly strengthened. If you don’t have chalk, buy some now. If you’re running out of chalk, buy some now
so you don’t forget to do it later.
Baby powder is not something that I personally use in training. Baby powder is notoriously hard to clean up and when it gets all over the place, it can become a huge hassle for the gym owner/keeper. Unlike chalk, which just sort of dries things out, baby powder makes them slick. A slick floor can be dangerous.
However, in a meet, baby powder is a fantastic tool. Usually, meets will have a designated area where you can apply baby powder. There are generally two useful places to put baby powder. For all forms of the deadlift, placing baby powder up and down the legs reduces friction as the bar drags against your body. When you pull the bar against your body, you’re fighting both gravity AND fraction. Because baby powder reduces friction, this lets you use a little more of that force towards combating gravity. You’ll lift more pounds and post a bigger total. For mixed grip pullers specifically, consider placing baby powder on lat of your underhand grip side. This will reduce the problems caused by the tricep running into the lat.
Pro tip: do NOT apply the baby powder yourself if you can help it. Avoid getting this stuff on your hands at all costs. If you do get it on your hands, it acts in the exact opposite manner as chalk. Your grip will be significantly worsened and you won’t be able to hold onto anything resembling respectable poundages. Try to get someone to help you rather than risking getting it on your hands.
If you don’t have ANY baby powder, I highly recommend that you buy some now. Practice with it once or twice to see if it will make a difference at your next meet. If you pull sumo, and thus drag the knurling up your legs, I consider it mandatory. Every powerlifter should have at least one bottle of baby powder
.

Jordan Feigenbaum pulling with baby powder on his legs.
Credit: barbellmedicine.com
Wrapping Up
Well, guys and gals, that concludes the technique series! I hope this was informative and helpful. If you have questions, now is the time to ask.
As I’ve said before and as I’ll say again, if you enjoy this type of biomechanical analysis. You need to do yourself a favor and grab a copy of Starting Strength.
Be on the lookout for our next article series: Powerlifting Gear. In our Powerlifting Gear series we’ll cover belts, knee sleeves, wrist wraps, shoes, and a whole lot more. Not only will I discuss the optimal specifications for each piece of equipment as they pertain to each lift, I’ll discuss the best way to use them as well.
If you want instant notification when the first article in the Powerlifting Gear series is released, make sure to subscribe to our newsletter!
Like this Article? Subscribe to our Newsletter!
If you liked this articled, and you want instant updates whenever we put out new content, including exclusive subscriber articles and videos, sign up to our Newsletter!
Questions? Comments?
For all business and personal coaching services related inqueries, please contact me:
Table of Contents
Part I: The Scientific Principles of Powerlifting Technique
Part II: Squat Form Analysis
Part III: How to Squat Like A Powerlifter
Part IV: Bench Form Analysis
Part V: How to Bench Press Like A Powerlifter
Part VI: Deadlift Setup Science
Part VII: Deadlift Form Analysis
Part VIII: How to Deadlift Like a Powerlifter
This is a great article! I have recently switched to sumo stance and added 20 pounds to my lift, 315 to 335 (probably more now). I would like to ask what are some good accessory lifts i should do besides weighted hypers for sumo? i’ve always been confused what accessory lifts to help with the deadlift and also the squat, also when to do them. Should i do block pulls after my deadlift sets or on separate days? should i do box squats on squat day or on a separate day too? Thank you for your time!
When you should do the exercises totally depends on your program. Personally, I prefer to deadlift twice a week and I’ll do my main accessory on the second day. So, if it was block pulls, I’d do block pulls on the second deadlift day and I’d do them first while fresh. Now, lots of other people only deadlift once per week. If that’s the case, you’d want to do them after doing the competition style deadlift from the floor. My favorite accessories are pause deads (barely break from ground and hold for 2-3 secs) and deficit deads for sumo pullers. For more info on programming, check out our free eBook: http://www.powerliftingtowin.com/programmingtowin.