


I don’t care if I sound like a broken record: the principles used to create the optimized powerlifting bench press technique in this article were distilled from Mark Rippetoe’s Starting Strength. If you find yourself enjoying this type of analysis, you’ll love Starting Strength. Do yourself a favor and snag a copy of the book.
.
In the foundation article of this series, the concept of moment arms was introduced. The sum total length of all relevant moment arms on the lifter/barbell system equates to the amount of leverage the lifter must overcome to complete the lift. If you’re not aware of what a moment arm is, see Part I.
For lifters with “poor” leverages, 405lbs is not the same 405lbs that is for a lifter with “good” leverages. In fact, the strongest lifter doesn’t always win on a given lift. Sometimes, it is the lifter with the more advantageous body type. And, more importantly, sometimes it is the smarter lifter who knows how to manipulate the leverages of a given lift to his favor. Let’s analyze how we can do that in the bench press.
If you don’t mind missing out on a few of the finer details, the following video summarizes this article well:
Balance and The Shoulder Joint
In the squat, the mid-foot is the balance point of the system. Any time you bring the center of mass (CoM) of a system out of line with its balance point, you create an unnecessary moment arm. In much the same way that it requires greater effort to stay afoot when you’re leaning backwards, it takes greater effort to move a weight when it is being moved out of balance.
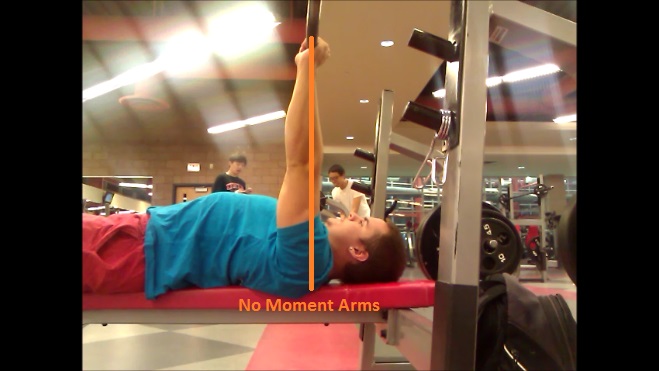
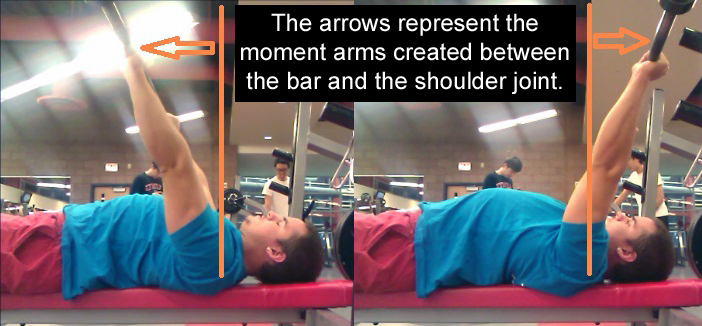
In the bench press, the shoulder joint is this point of balance; the shoulder joint represents the fulcrum of the system. Consider a wrench once more. The bolt is the fulcrum and the wrench handle is the moment arm. And the shorter the handle the less effective the wrench will be. Because our shoulder is that “bolt”, we want to minimize any moment arms in order to improve our leverages.
Benching in a Straight Line
Wait a minute; am I essentially advocating a straight line bench? In a perfect world, a straight line bench would be the most mechanically efficient way to press. However, due to the anatomical construction of the vast majority of shoulders, this is impossible.
You see, shoulder joints tend to “impinge” when the elbows travel in a line parallel to the bar. When you reach somewhere around 90 degrees, the bony parts of the shoulder run into rotator cuff. Over time, you can literally saw a hole into your rotator cuffs by benching with your elbows completely flared. This is why the bench press has a reputation for being a shoulder destroyer. Performed incorrectly, the movement can and will cause impingement which, over time, will lead to shoulder degradation.
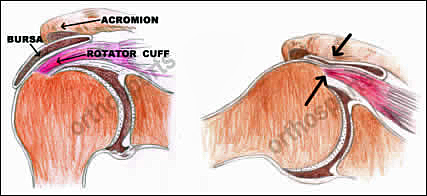
Photograph: orthosports.com
If our career in the sport is to be a long one, and it should be in order to give us the necessary time to maximize our genetic potential, we must preserve the health of our shoulders. This requires benching with a non-vertical bar path.
Avoiding Shoulder Impingement in the Bench Press
So, this raises the question. Exactly where should the bar touch on the chest in a bench press designed for optimal powerlifting performance? The answer is remarkably similar to our answer for squat stance width.
As you might expect, there are several common genetic variations when it comes to the shoulder joint. For some, impingement will occur with less shoulder rotation than others. Unfortunately, there is no way to prescribe a specific touch point except on a case by case basis. First and foremost, you must protect your shoulders. In order to do this, you’ll have to experiment to see what you can personally get away with. The closer to the joint, the more mechanically efficient you will be.
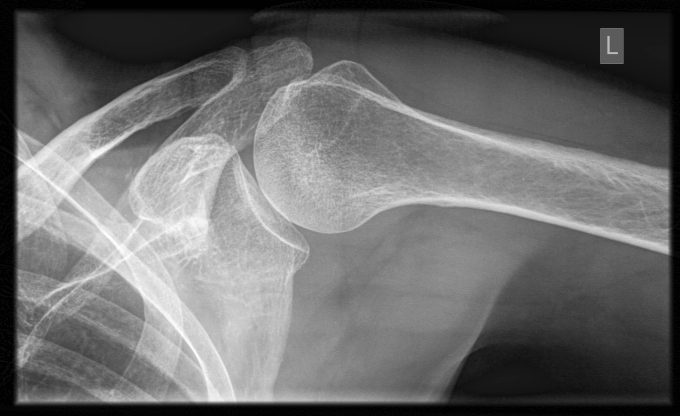
This is your shoulder joint.
This said, there are some ways that everyone can “move” their ideal touch point closer to the shoulder joint itself.
Bench Press Grip Width
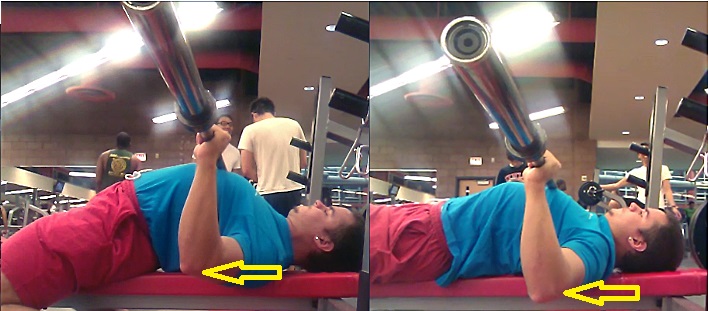
Remember, impingement is going to happen at a particular degree of shoulder rotation given a certain amount of shoulder abduction (shoulder abduction is the degree to which the elbows are flared; 90 degrees being completely parallel to the bar). By taking a wider grip, we can decrease the amount of distance the bar has to travel in order to achieve full range of motion.

Look at the yellow arrows pointing to the catches on each upright. The wide grip bench (right) clearly cuts off 2-3″ of RoM compared to the narrower grip.
A wider grip also allows us to get closer to the shoulder before impingement starts to occur. Because the range of motion has been shortened, you’re getting “deeper” with the bar for the same amount of shoulder rotation. What this means in practical terms is that you don’t have to touch as far down your chest as you normally might with a closer grip.
However, I must make a cautionary note. Grip width itself will present shoulder problems for some anatomical variations of the shoulder joint. In this case, the same principles still apply, but the exact grip width must be moderated. Essentially, use the widest grip you can tolerate without pain. In the context of your circumstances, this will still result in the shortest range of motion possible and the touch point that is closest to your shoulder joint.
In sum, the wider grip both significantly decreases the range of motion and shortens the lever arm between the shoulder and the bar. Both of these factors will allow for more weight to be lifted even absent a gain in strength.
The Bench Press Arch
Developing a good arch in your back is one of the most critical components to perfecting your bench press technique.
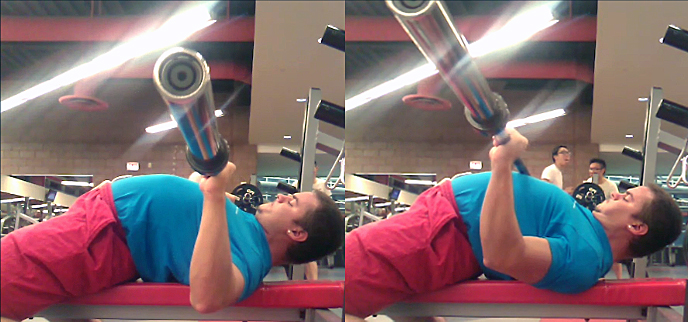
Notice the elbow height relative to the bench pad. When you arch (left), you cut the range of motion another several inches.
First, let’s address the obvious. The arch significantly decreases the range of motion of the movement. In much the same way that you will always quarter squat more than you can squat to depth, you’ll always bench more with an arch versus what you can bench without an arch.
However, the arch also allows for a closer touch point to the shoulder for exactly the same reason that the wider grip does: less range of motion means less degrees of shoulder rotation at a given distance from the chest.

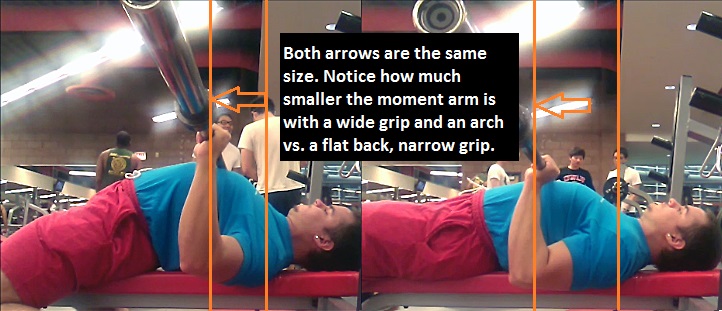
Shoulder impingement happens after a certain degree of shoulder rotation when the bar is traveling directly over the shoulders. Both positions start at 0 degrees of shoulder rotation. Which one do you think will cause impingement further away from the chest? Both arrows are the same exact size.
In combination, a wide grip and a sizeable arch allow a lifter to minimize the moment arm between the shoulder and the bar. If that wasn’t enough, this potent combination can also reduce your range of motion by ~6” depending on the size of your frame.
This is why we can have a 14 year old, 130lbs girl benching 255:
Touch Point in the Bench Press
So, let’s bring this all together. The shoulder joint represents the balance point, the fulcrum, in the lifter/barbell system during the bench press. While avoiding shoulder impingement, we want to touch as close to this joint as possible. In order to do this, we take as wide grip of a grip as we can manage without pain. We also use as big of an arch as possible.
Your personal touch point will be determined by a combination of all of the following factors: anthropometry (your segment lengths; arms, torso, etc.), the size of the arch you can produce, the width of the grip your shoulders can tolerate, and the highest point on your chest as a result of your arch.
Let’s address that last point. Sometimes, due to the way your body is constructed, it will be worth it to touch slightly further away from your shoulders in order to cut down on your range of motion. For example, some guys have bellies so large that, for them, touching the highest part of the abdominal wall allows them to cuts several inches off of the range of motion. Even though this increases the moment arm between the bar and the shoulder, they end up moving more weight due to the decreased range of motion and the improved leverage of their bottom position (joint angles when the bar touches).
The ideal spot to touch is a compromise between the highest touch point (right) and the straightest bar path (left).
All in all, the bench press touch point takes quite a bit of personal experimentation, but always keep in mind that, as in all of the powerlifts, you’re looking to minimize both the moment arms involved and the range of motion. Sometimes, you need to make a compromise between the two. Within this very, very small band of bench technique, you will actually have to find “what works for you”.
Bench Press Bar Path
Now that we’ve established that benching in a straight line is impossible when we stay over the shoulder joint, we have to wonder what is the precise way that we should move the bar?
The sooner we can get the bar back over our shoulder joint, the better. This is the position of best leverage. When the bar is over the shoulder joint, there is zero moment force between the shoulder and the bar. So, instead of perhaps a backwards diagonal line, a proper bench press employs a “J” curve bar path.
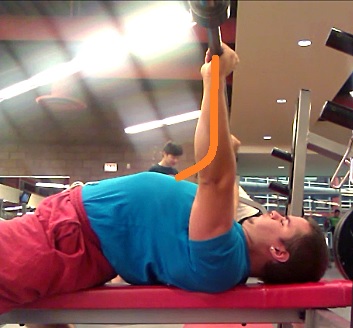
The proper bench press bar path.
The “J” curve allows us to most quickly get the bar back in line with our shoulder joint without causing any impingement. In terms of application in the weight room, this means your initial push is actually going to be up AND back. Once the bar finds the “groove”, right above the shoulder, you’ll be pushing straight up to lockout. That first part will be curved, though. And, overall, the bar path will resemble a “J”.
Moving Forward
In this bench press form analysis we’ve established that the best way to bench for the purposes of powerlifting, the way that both minimizes range of motion and the relevant leverage on the system, includes as wide of a grip as possible and as big of an arch as possible. It also includes a touch point that compromises between being as close to the shoulder joint as possible without causing impingement and touching the highest point of the lifter’s arched body.
If you liked this article, you’d love Starting Strength. The book contains more than 300 pages of detailed biomechanical analysis and applied classical mechanics with the lens directly focused on the powerlifts. The foundation of my technique knowledge was forged through the book.
In the next installment of this series on powerlifting technique, we’ll cover how you actually bench. In Part V, I’ll describe and demonstrate all of the following: the optimal amount of elbow tuck, how to set-up an arch, how to get “tight”, how to use your lats in the bench press, and a variety of my favorite tips, tricks, and cues for increasing bench press performance.
Like this Article? Subscribe to our Newsletter!
If you liked this articled, and you want instant updates whenever we put out new content, including exclusive subscriber articles and videos, sign up to our Newsletter!
Questions? Comments?
For all business and personal coaching services related inqueries, please contact me at admin@powerliftingtowin.com.
Table of Contents
Part I: The Scientific Principles of Powerlifting Technique
Part II: Squat Form Analysis
Part III: How to Squat Like A Powerlifter
Part IV: Bench Form Analysis
Part V: How to Bench Press Like A Powerlifter
Part VI: Deadlift Setup Science
Part VII: Deadlift Form Analysis
Part VIII: How to Deadlift Like a Powerlifter
I have trouble setting a good arch in the bench press, and I believe this is the main cause of anterior shoulder problems in the bench press. I don’t know if it’s a mobility issue, though I suspect it is because of tight upper back and somewhat lacking shoulder mobility. Pressing is no problem. Bench pressing? Mucho problems.
I watched Dave Tate’s “So you think you can bench” series, and I use the same setup. But still my arch is not very archy, it’s just not happening. It’s pathetic. When I compare elbow postition when I try to arch max it’s not very different compared to a more sloppy setup. Any advice on how to improve my arch?
I’m looking forward to the next installment of this series. Great work, well worded and with illustrative images. Thumbs up!
Thanks, I’m glad you’re finding the content valuable!
I have worked on my arch extensively so I definitely have a few tricks that I can give you. For shoulder flexibility, my number one go-to exercise is good ‘ole shoulder dislocations. Just get a broomstick or a piece of PVC pipe and slowly work your grip in over time. This should allow you to hold your shoulders in external rotation throughout a full range of motion.
As for arching, I think different methods work better for different people. I have three different set-up techniques that I show to people all of which I will be covering in the next article. As far as mobility to actually address getting a bigger arch, for now, I can highly recommend this great video by Chris Duffin: http://www.youtube.com/watch?v=NPRhXFLmH0Q
RE: arching… it’s a problem I’ve always had, since I’m 6’4″ and have pretty long legs. Using a 17″ high bench, I physically can’t get my feet back far enough to create an effective arch without cramping in my quads. The closest I’ve come is to try and have my feet wider, but again, it causes cramping. If I cramp on rep 3 of a heavy set of 5, I’m pretty much screwed.
And regarding grip… are there concerns for you that benching with too wide of a grip could cause problems with the radial deviation of the wrist? Or would sturdy wrist wraps take care of that for you?
Believe it or not, tight quads can actually be one of the main “mobility” issues on the bench press. Rolling and stretching your quads before you bench might end up being the difference maker for you.
There should definitely be concerns over wrist position for those who do not have naturally bigger frames. However, as active competitors in powerlifting, you have to weight the risk/reward. In this case, with heavy 36″ wrist wraps, the risk is minimized to a degree that, in my opinion, the wider grip is worth the reward. But no, I would not attempt such a grip without wrist wraps to be honest.
Holy shit, I got some work to do. Rumble roller on the rib cage, that sounds just lovely. I look forward to the next installment. Thanks for the advice!
Haha, Duffin is an intense dude. But that is why he is on track to hit 850/500/900 at 220. The next piece should be out by tomorrow evening. No problemo. Always feel free to ask any questions if you have them.
Why don’t you use a belt on the bench press, Tom? I’m on the fence about that.
Steve, I do generally use a belt on bench. I don’t feel that it makes a tremendous difference either way, but it will help keep your shirt down which is always nice. Like in any other movement, being tight is the number one form criterion once you’re correctly set-up. The belt gives you some feedback on your overall tightness which does help, IMO.
As for feet-up vs. feet flat, I will cover this is in greater depth in the next section, but I pretty much agree with Dan, actually. It is funny because I think he has some of the best technique in raw powerlifting but his explanations for why he does it the way he does are so laissez faire that you’d think he kind of just made it up as he went along. It is obvious he didn’t, I just find the California attitude funny. Anyways, the only advantage of having your feet up and behind you is a greater arch, IMHO. If you don’t get more of an arch out of it, there isn’t much of a point. I think it is very possible to raise your ass up with your feet in front of you, but there is no doubt you’ll get better leg drive with this method. With more of the foot on the ground, and in a better position to push, it is just easier to get a bite on the ground and do just that, push.
Also, what is your position on flat feet vs. feet back toes up?
Always found this interesting:
http://www.youtube.com/watch?v=TLfo-VJGOK4
I meant heels up.
I have been lifting since the 70’s and it is a very nice article and lecture you did on this. One of the best descriptions of how to do it and show why it is important to do it. But like you said you will do more on just certain parts of the lift and this is good as books can be made on just arching.
I’ve always been a poor bencher and yes I have SHORT arms! My raw bench has never gone over 400 in a meet and occasionally I have hit 405 in the gym and once I even hit 420! But my meet best is 390 and in a shirt I have hit 610.
The thing that seems to help my hit heavier loads is a tightness in the lats by starting with the bar slightly forward with a arch. Would you suggest something different for me? Or continue with this style and work on getting tighter?
Hi Mike,
I’m glad a lifter as experienced as yourself enjoyed the article!
You wouldn’t happen to have any video of you benching would you? Tightness is always a huge concern for me, personally. Even when the rest of my technique is clicking well, I always cue myself to “get tight”. Tightness will improve force transfer and will carry over to more weight being lift.
If you’ve been stuck for a long time, perhaps it is programming rather than technique that is holding you back?
Great content and more importantly easy to read and understand! After playing with a variety of grips, the one that causes the less pain is basically a close grip with pointer finger right on the outside of the smooth part of the bar, I have never had shoulder issues but as soon as I move my hands out, the bar slows down and it hurts my shoulder. Am I stuck at being a close grip bencher? Any suggestions? Thanks man!
Thanks!
Hard to tell without seeing a video of your form. The two things that will help the most are: a) getting a bigger arch on your bench and b) touching lower (further away from your shoulder). The lower touch point decreases the likelihood of impingement just due to should anatomy. The bigger arch may also help because less range of motion means less degrees of shoulder rotation. Shoulders generally don’t start to hurt until they hit a certain point. With a big enough arch, and a lower touch spot, you may be able to avoid the point in the range of motion where they start to hurt.
Hope that helps.