


I have to make it abundantly clear that many of the biomechanical principles and physics applications in this article are derived from Mark Rippetoe’s Starting Strength. If you enjoy discussions on leverage and optimizing technique, do yourself a favor and grab a copy of the book
.
Of the three powerlifts, the conventional version of the deadlift is by far the simplest both in terms of set-up and execution. Despite this fact, among all three lifts, the deadlift is the lift most commonly misperformed by powerlifters all across the globe. As such, our deadlift analysis, unlike the other lifts, is going to take three phases.
First, we need to re-establish the scientific principles that govern proper powerlifting technique specifically as they relate to the deadlift. Second, we’ll analyze deadlift form and derive a model that optimizes the movement for powerlifting. Lastly, we’ll discuss how to actually perform the deadlift correctly.
The following article will attempt to establish three very interrelated things: a deadlift should begin with high hips, the front of the shoulders slightly in front of the bar (scapulas directly over the bar), and the bar must be pulled directly over the middle of the foot in a straight line.
If you prefer a more visually oriented learning style, watch the video version of this article:
The Vertical Bar Path
As discussed in Part I of this series, the human body balances directly over the middle of the foot. This doesn’t change in the deadlift. In powerlifting, lifters are often cued to “stay back” or “pull from their heels”. Understand that the point of these cues is to correct an exaggeration in the opposite direction. Namely, when a lifter has a bad habit of getting onto his toes during a lift, telling him to get on his heels tends to have the net effect of just getting him back over the middle of his foot.
Part I also argued that, in order to maximize efficiency, all work done should be work done against gravity. In order for this to happen the bar path has to be as vertical as we can manage because gravity operates strictly in the vertical plane. Any non-vertical displacement represents work not done against gravity. This work doesn’t help us complete the lift; it just wastes energy.
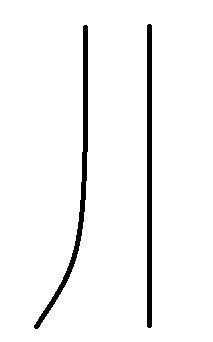
Both lines cover the same vertical distance but the bent line (left) is longer.
Work can be defined as force times distance. The shortest distance between two points is a straight line. A non-vertical bar requires us to move the bar further even though it travels the same vertical distance. The non-vertical bar path therefore requires us to do more overall work. We want to do less work so we can move more weight.
Hip Height in the Deadlift
These facts are both highly relevant to the deadlift discussion because the single most common and persistent form error on the deadlift occurs when lifters attempt to drop their hips too low to begin the movement. In fact, many coaches teach this as the correct way to pull. Further analysis reveals why this is incorrect.
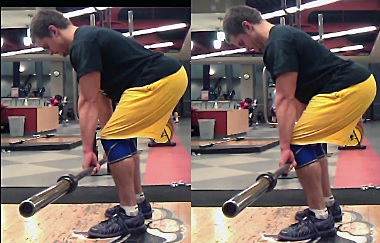
When the hips are dropped too low, the shins incline and knock the bar forward of mid-foot. This creates a moment arm between the mid-foot and the bar.
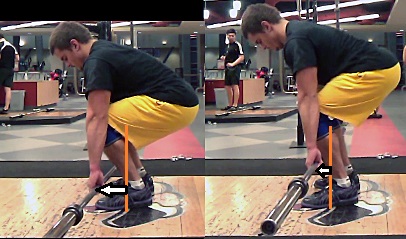
Notice that as the hips come up, the bar moves closer to mid-foot. Even the picture on the right presents hips that are a little too low (my bad).
The further you drop your hips, the longer this moment arm becomes. In fact, because deadlifts are so heavy, most pulls simply don’t leave the floor in this manner; the moment arm is too great to overcome. When the lifter drops their hips, the bar simply stays glued to the ground until the hips raise high enough for the bar to return to mid-foot. Lifters then complain that their hips “rise too early” in the pull when in reality their set-up is completely wrong. As it so happens, this even happens to the greatest powerlifter of all-time, Ed Coan:
Go to about 32s into the video. Watch Ed drop his hips and push the bar forward. Now, move the video forward frame by frame. Do you see that the bar doesn’t leave ground until Ed’s hips come up and the bar returns to mid-foot? Why not just start there? When you start with the hips low, your body has to stay under tension longer because of that extra second you spend waiting for the hips to adjust to the correct height. This extra second of isometric effort takes a lot of energy. This is energy better used to pull heavier weights.
So, what’s the take away here? The correct deadlift starting position mandates that the bar remain directly over mid-foot. This is only possible with minimal inclination of the shins. When you drop your hips low, your shins assume an angle which makes it impossible for the bar to remain over mid-foot. This greatly decreases efficiency. The hips must remain relatively high when we pull because there is no other way to keep the bar directly over the middle of the foot. Sorry for being a bit repetitive there, but this is something that must sink in.
Deadlift Shoulder Position
Just as the body balances over the middle of the foot, the arms, when hanging, have a balance point as well. Though the following anatomical description isn’t perfectly accurate, it will work for our purposes: the humerus (upper arm bone) is suspended by muscle and ligament from the scapula; the “arm” articulates in the shoulder joint which is attached at the scapula.

Note relationship of the scapula and the humerus.
This being the case, the arms require the least amount of effort to be balanced when they hang plumb from shoulders and the scapula. Think of a dumbbell front raise. This movement purposely takes advantage of the moment arm that is created between the dumbbell and the shoulder joint, transmitted along the arm, in order to stress the front deltoid.
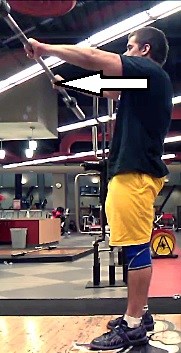
The white arrow represents the moment arm created between the bar and the shoulder.
This is all just a fancy way of saying that when your arms hang directly down from your shoulders they’re balanced. But not the front of your shoulders. And not the back of your shoulders, either. Your “arms”, the humerus specifically, hang plumb from the scapulae because that is what they are suspended from.
So, all in all, we want the scapulae directly over the bar to eliminate any potential moment arm between the scapular balance point and the bar being held in the hands.
Deadlift Arm Angle
If you’re following what we’ve been saying thus far, we’re currently left with a model where the bar is both directly over the middle of the foot (where our body balances) and directly underneath the scapulae (where are our arms balance).
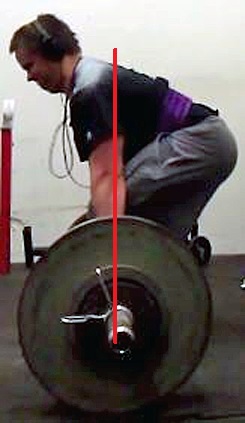
This leaves us with a position where the arms are hanging perfectly vertical to the bar. There is one big problem. The arms don’t hang vertically in a heavy deadlift!
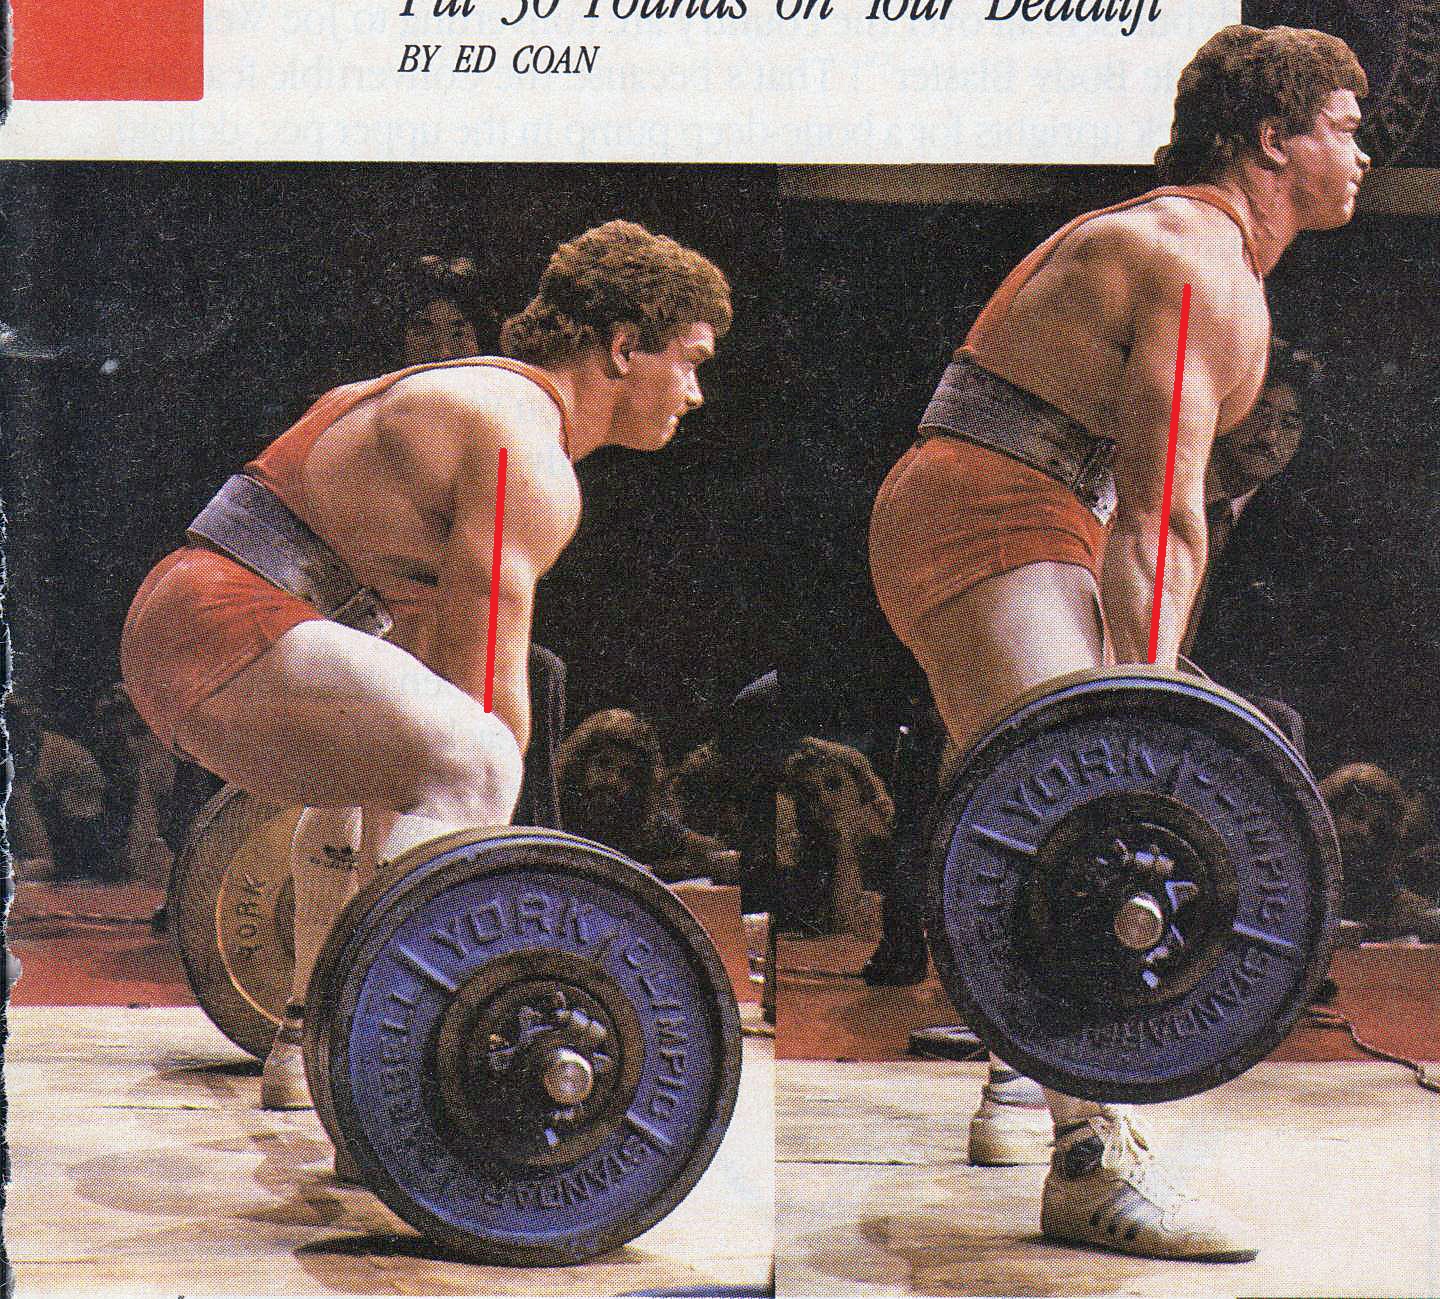
Note the angle of Ed’s arms here. There is a ~10 degree inclination
What gives? Let’s break it down.
When the arms are inclined, the arm is thrown out of vertical alignment with the shoulder joint. The bar will still rest in the hands directly under the scapula, but gravity will attempt to pull the arm into the greatest position of balance with the shoulder joint, arm, and scapula all aligned vertically. So, some muscle group(s) must be responsible for holding the arm at this inclined angle; some muscle group(s) must combat the tendency of gravity to pull the arms plumb to the shoulders.
The bar wants to swing out directly underneath the shoulder (left). The lats keep it from doing so (right).
As it turns out, this is properly the job of the lats. Before we get to that, we need to talk about hip position.
When the arms are inclined, and the bar remains directly over mid-foot and directly under the scapulae, the hips can be held higher and thus closer to the bar. This is going to reduce the moment arm between the hips and the bar. As we’ve learned in Part I of this series, when the relevant moment arms are shortened, the movement becomes easier.
Consider the following three positions:
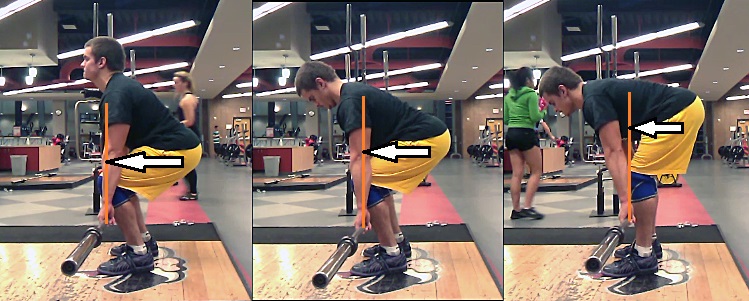
The arrows represent the moment arm between hips and the bar. As the hips raise, the moment arms shorten because the hips get closer to the bar
You’ll notice that as the arms become more and more inclined, the hips raise and get closer and closer to the bar. The net effect is that the moment arm between the hips and the bar is reduced thus improving our leverages. This raises the question: why don’t we incline our arms even more, push our shoulders even further out in front of the bar, and get our hips even closer to the bar?
Now we can get back to the lats. You see, the lats also attach to the humerus. They are the muscle group responsible for pulling on the arms and keeping them at the inclined angle they assume in heavy pulls. The amount of force required to do this is immense. As such, the lats have to maximize their efficiency by assuming the optimal angle of relationship.
Let me ask a question. At what angle is a wrench most effective when trying to turn a bolt? The answer is 90 degrees to the bolt. This is because a right angle is the angle which maximizes the length of the moment arm.
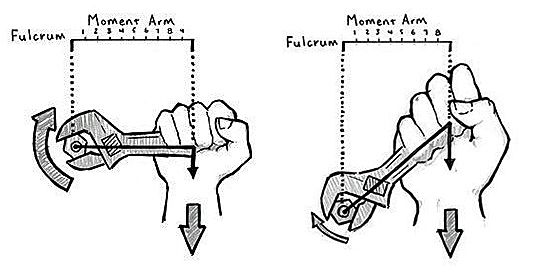
Moment arms are shorter and thus less effective when not operating at right angles. Photograph: Mark Rippetoe. Starting Strength: Basic Barbell Training. Rev. 3rd ed. 2012.
Similar to the fact that a wrench is most effective when held at 90 degrees from the object which you are trying to rotate, the lats are most effective when held at 90 degrees from the objective which they are trying to stop from rotating.
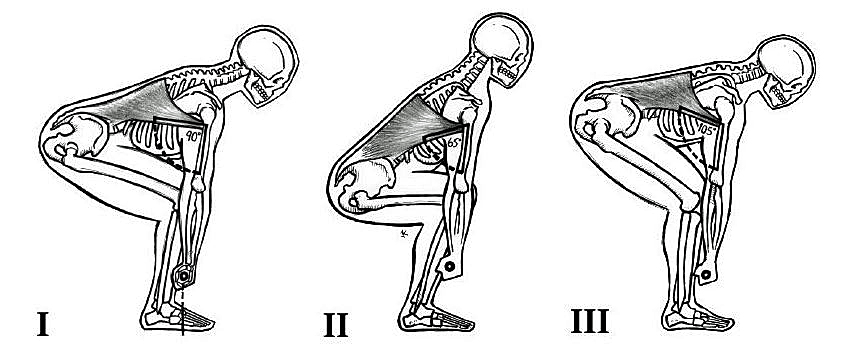
A 90 degree angle between the lats and the humerus is one of the primary determinants of proper hip height in the deadlift.Photo: Starting Strength 3rd Edition, Mark Rippetoe, 2014.
This is why the front of the shoulders must start slightly in front of the bar. In no other position, with either the shoulders more forward or more backward of the bar, can the lats operate at their maximum angle of efficiency while maintaining a bar position directly underneath the scapula. With the shoulders either further ahead or further behind the bar, you end up creating a position where the arms are out of alignment with the scapula or where the lats are operating from an angle other than 90 degrees.
Bringing It All Together
All we’ve done at this point is establish three important diagnostic checks for a proper deadlift starting position:
1) Is the bar over mid-foot?
2) Is the bar directly underneath the scapula?
3) Are the shoulders slightly in front of the bar?
If yes, we’ve at least started correctly.
Proper alignment in the deadlift start positions occurs when the bar is directly over the mid-foot and directly underneath the scapula with the shoulders slightly in front of the bar.
If you enjoyed this type of biomechanical analysis, I implore you to consider grabbing a copy of Mark Rippetoe’s Starting Strength. While I did my best to cover some of these topics in article form, there is nothing quite like 300+ pages of thorough discussion on a topic like this. If you want to learn more about how to apply classical mechanics to powerlifting, Starting Strength is a great resource.
In Part VII, we’re going to analyze deadlift form leverages and determine the optimal technique for the purposes of powerlifting.
Like this Article? Subscribe to our Newsletter!
If you liked this articled, and you want instant updates whenever we put out new content, including exclusive subscriber articles and videos, sign up to our Newsletter!
Questions? Comments?
For all business and personal coaching services related inqueries, please contact me at:
Table of Contents
Part I: The Scientific Principles of Powerlifting Technique
Part II: Squat Form Analysis
Part III: How to Squat Like A Powerlifter
Part IV: Bench Form Analysis
Part V: How to Bench Press Like A Powerlifter
Part VI: Deadlift Setup Science
Part VII: Deadlift Form Analysis
Part VIII: How to Deadlift Like a Powerlifter
Great web-site! I’ve found a lot of really useful information here, I really enjoy your articles. Thanks for doing this. This deadlift set-up article, for instance, is much easier for me to understand than the 2 versions of Starting Strength that I’ve read (I’m not knocking SS, BTW.) Keep em’ coming!
Eric Davis
Tacoma WA
Thanks! Glad you’re finding it useful, man. I’m working on producing new content all the time so I promise there is definitely more coming.
Great article Tom. I have a slight quibble with your wording above and below the wrench illustration. Above the illustration you ask “at what angle is a wrench most effective when trying to turn a bolt?” The answer to that question is that there is no optimal wrench angle since the bolt spins about an axis. I think the question you want to ask is “at what angle to the wrench, and at what point along the handle is the most effective to apply force to the wrench?” The answer to that being, at 90 degrees to and at the very end of the handle.
Thanks again for the great site. How about an article on making weight and determining your optimal weight class?
Good catch, thanks Brian.
I will definitely be writing articles both on how to make weight and how to pick the optimal weight class although, believe it or not, the former is a lot more complicated and in-depth than the latter. If you’re interested, we just had a discussion on my log about this: http://startingstrength.com/resources/forum/showthread.php?t=45630&p=843570#post843570