


In Powerlifting, athletes often select their technique in one of two ways: a) they simply “do what works for them” (what is most comfortable, usually) or b) they copy great lifters. While both of these methods have their merits, unless you get lucky, both tend to cause more problems than they solve.
In this article, we’ll endeavor to use a different approach to optimizing technique. Instead of trial and error, or attempting to mirror successful athletes, we’re going to analyze each lift from the framework of classical mechanics and biomechanics; we’re going to look at the scientific principles that govern optimal technique.
If this sort of science based information appeals you, I highly recommend that you grab a copy of Mark Rippetoe’s Starting Strength. The book contains over 300 pages of mechanical analysis on the big, compound lifts.
“Do What Works For You”
When lifters are left alone to self-select their technique based on what “feels” the best, a great deal of their technique is determined arbitrarily. If you’re just doing what is natural and letting the chips fall where they may, chances are very high that you skipped over a few important details that could’ve helped increase your performance.
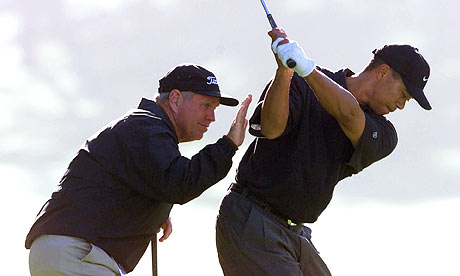
Even Tiger Woods has a coach help him analyze the details of his technique. Photograph: Eric Risberg/AP
There is a reason that nearly all athletes have coaches. Athletes, left to their own devices, do not self-select optimal techniques. They self-select comfortable techniques. As competitive lifters, we can’t afford to do what is comfortable in favor of what is best. As competitive lifters, we can’t afford to leave pounds on the table.
Copycatting
Copying great lifters can often be a fantastic way of coming up with a good starting point for your own technique. However, for whatever reason, many times people think that the amount of weight that someone can lift is an accurate measure of how knowledgeable they are about the sport. This simply isn’t true. While being incredibly strong is the best indicator that someone knows what they’re doing, it isn’t infallible. Many lifters succeed in spite of certain things that they do rather than because of them. If you’re one of the hardest workers in the world, and you have great genetics, technical errors can easily be overcome. That said, why not accumulate every advantage that you can? If you’re not a particularly talented lifter, you NEED every advantage that you can get.
Additionally, if the lifter you try to copy doesn’t have the same leverages as you, in terms of body type, you might be trying to put a square peg into a round hole. If you have a short torso, you shouldn’t ever expect to have an upright squat like a long torsoed lifter will. Likewise, if you don’t have gorilla arms, your back angle off the floor in the deadlift will be more horizontal.
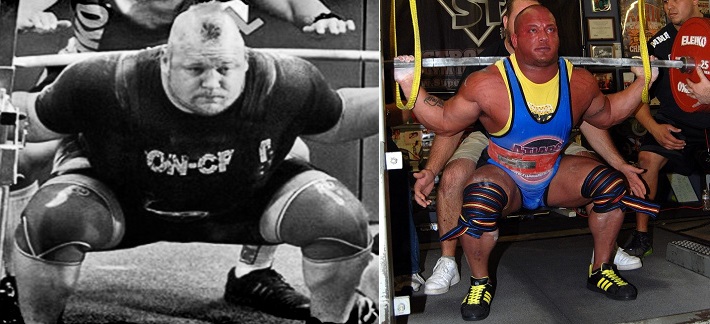
Two World Record holders, two completely different body types. Photograph: jtsstrength.com
Selecting Your Techniques
So, if we’re not going to just “do what works for you” or copy our favorite lifter, how exactly should we determine what technique is best for us?
Well, first, we need an objective way to evaluate various techniques and their efficacy for the sport of powerlifting. This requires two things: a) solid understanding of our objectives and b) a framework capable of accurately modeling what goes on when you lift weights.
Luckily, both problems are easily solved. Our objective is quite simple in powerlifting; we’re trying to lift the most weight possible. There is no other objective. People often balk at sumo deadifts or bench presses done with a huge arch, but the bottom line is that there are no style points in powerlifting. You don’t get extra credit for doing extra range of motion. Our techniques should be optimized for lifting the heaviest weight possible while following all the rules of the given event. Anything else is sub-optimal.

This is not cheating; this is fantastic technique.
As for b), well, luckily we have the study of classical mechanics. By understanding some basic physics, we can actually construct a model from which we can begin to manipulate the various lever arms involved in squatting, benching and deadlifting. In short, with the help of some elementary science, we can maximize our leverages for powerlifting.
Principle #1: The Straight Bar Path
Before we can go any further, we need to discuss a few simple facts about gravity.
First of all, gravity operates perpendicular to the surface of the Earth. For our purposes, this means gravity is pulling straight down towards the floor. As such, the most efficient way to oppose this force is by acting directly against it in the vertical plane. You can roll a loaded barbell half-way across the gym, but you won’t have done any work against gravity.
This means that (with the exception of the bench press) a completely straight up and down bar path is the most efficient way to lift weights. Make no mistake, it still takes force production to generate horizontal movement; and yet, none of that force is going towards actually helping you beat gravity and finish the lift. In simple terms, this is wasted energy. This is inefficient. This is bad technique.
To be succinct, good technique means moving the bar in as vertical of a line as is possible.
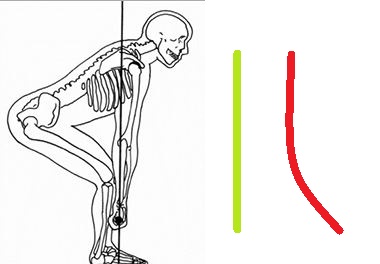
Notice that both lines have an equal amount of vertical displacement yet the redline is much longer. A non-vertical bar path results in more work needlessly being done. A vertical bar path is most efficient.
Principle #2: The Mid-foot Balance Point
One of the most common technical mistakes in powerlifting occurs when lifters shift their weight onto their toes when squatting or deadlifting. The best way to correct an exaggeration in one direction is with an overcorrection in the opposite direction. Hence, some of the most popular “coaching cues” in powerlifting are “get your weight on your heels” and/or “push through the heels”. The contexts of these cues have been lost for whatever reason and many people have been led to believe that optimal technique actually involves being balanced on your heels. This is certainly not the case.
The human body balances directly over the middle of the foot. This is due to the fact that the very middle of your foot is the point at which there is an equal amount of distance from the front to the back of the shoe. As such, the middle of the foot is the balance point which takes the most force to disrupt in either direction, forwards or backwards. Naturally, this is the point your body favors for balance.
Confirm this for yourself with a simple test. Stand up. Put your hands on your hips and lean forward slowly. Do you feel the tension in your calves preventing you from falling forward? Now, lean back slowly. Did you just shoot your arms out in front of you to counterbalance? Your body has to do isometric work in order to stabilize itself when you’re not balanced over mid-foot.
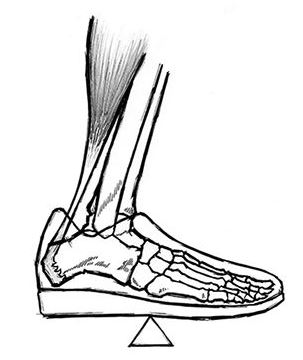
The mid-foot balance point. Photograph: Rippetoe, Mark (2012-01-13). Starting Strength (Kindle Location 377). The Aasgaard Company. Kindle Edition.
The situation isn’t different with a barbell on your back. If a lifter is to maintain balance, with the bar forward or backward of the middle of the foot, his stabilizing muscles will have to work that much harder to maintain proper position. Why work harder to lift the same amount of weight? Even more aptly, why not work just as hard, but lift more weight?
If you’re still not convinced, exaggerate the effect. Try to do an air squat with your shoulders (where the bar would be) a full foot behind your feet. A brief word of caution: when you fall, try not to hurt yourself.
Principle #3: Minimize the Moment Arms
So, in consideration of Principles #1 and #2, we now know the bar must travel in a straight vertical line directly over the middle of the foot. Next, we have to determine the best possible arrangement of our joints on either side of that mid-foot line.
Before we can do that, we need to understand moment. Think of a wrench. Moment is the force that is transmitted down the handle to turn the bolt. In broad terms, for our purposes here, moment is the force that causes rotation at pivot points. For example, our knees and hips would be pivot points in the squat.
More importantly, a moment arm is the distance between the pivot point and the point of force application measured at 90 degrees from the point of said force application. Let’s use the squat as an example. Our knees and hips would act as the pivot points; the heavy barbell is the point of force application due to gravity pulling it down; as such, the moment arms are the distance between the hips and the bar and the knees and the bar.
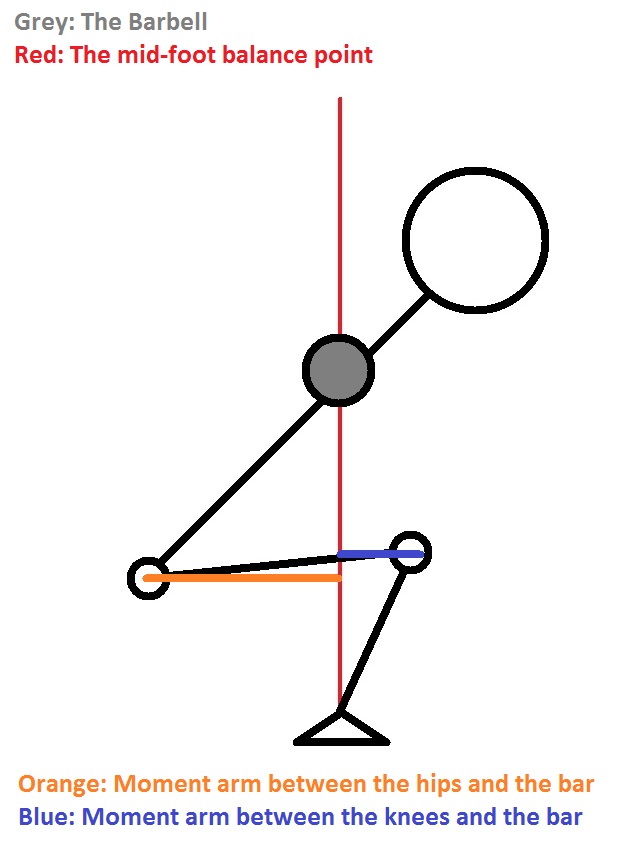
In terms of powerlifting, we can think of the size of the relevant moment arms of each lift as the amount of leverage that we have to overcome to lift the weight. The longer these moment arms are, the more effort we have to exert to move the same amount of weight.
The single most important purpose of powerlifting technique is to minimize the relevant moment arms as much as possible.
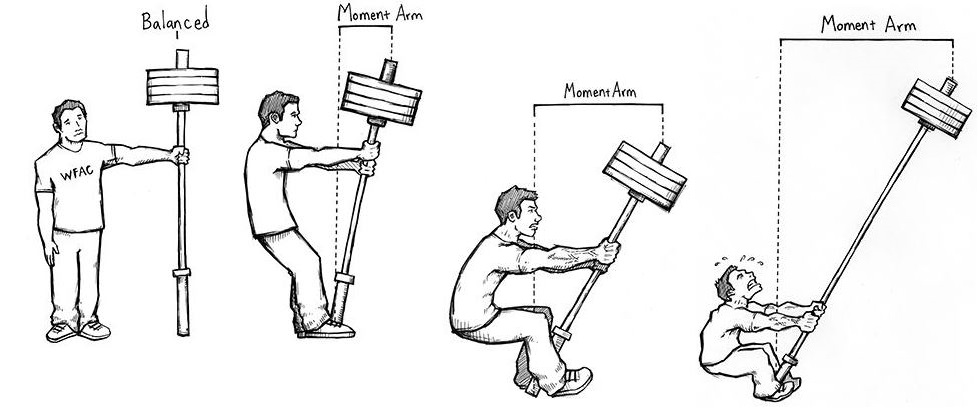
THIS is why you want to minimize moment arms. Photograph: Rippetoe, Mark (2012-01-13). Starting Strength (Kindle Location 958). The Aasgaard Company. Kindle Edition.
If the moment arm concept is still a little fuzzy for you or if you’re interested in seeing some actual application of the concepts discussed above, definitely check out this video on powerlifting leverages:
Principle #4: Minimize range of motion
Now for the factor you were probably expecting a whole lot sooner: minimize your range of motion.
Simply put, work can be calculated by multiplying force times distance. The longer you move a given weight, the more work you’ve done against gravity. Generally speaking, the more work you have to do, the harder your effort is. The harder you have to work to do a given movement, the less weight you can use on that movement.
In powerlifting, there are a variety of tricks we can use that minimize range of motion in each and every lift.
Fortunately, the vast majority of these tricks simultaneously reduce moment arm lengths while also allowing for a vertical bar path.
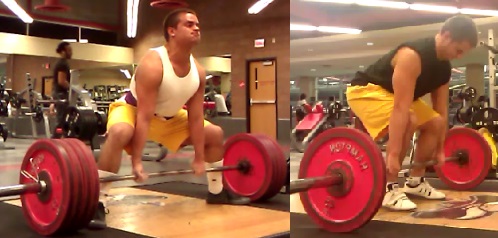
Pulling Sumo (left) instead of Conventional (right) is one way to reduce range of motion.
In the installment of this series on powerlifting technique, I’ll begin discussing some of those tricks. Part II will focus on how to optimize your powerlifting squat technique.
Starting Strength for Barbell Training, 3rd Edition
Before I conclude this article, I want to emphasize that I drew heavily on Starting Strength to create this content. To my knowledge, Rippetoe is the first (and only?) strength coach to provide an in-depth, biomechanical analysis of all of the powerlifts. Additionally, he explains their application and use for general strength trainees in a masterful manner that is literally unmatched any where else.
While Starting Strength is not a powerlifting book per se, it is one of the most important pieces of strength literature that a powerlifter can own. This is one of the few books that I can confidently state will change your understanding of the game forever. I personally don’t believe you can achieve your full potential as a powerlifter without a solid understanding of the physics behind barbell training. Starting Strength will provide you with the necessary tools and the framework to evaluate your technique in a whole new light. If you don’t get this info from Rip, get it from somewhere.
That said, I honestly cannot recommend Coach Rippetoe’s book strongly enough. You can pick up the Kindle Version at Amazonfor only $9.99. I promise those will be some of the most worthwhile $10 you ever spent on the sport.
Like this Article? Subscribe to our Newsletter!
If you liked this articled, and you want instant updates whenever we put out new content, including exclusive subscriber articles and videos, sign up to our Newsletter!
Questions? Comments?
Table of Contents
Part I: The Scientific Principles of Powerlifting Technique
Part II: Squat Form Analysis
Part III: How to Squat Like A Powerlifter
Part IV: Bench Form Analysis
Part V: How to Bench Press Like A Powerlifter
Part VI: Deadlift Setup Science
Part VII: Deadlift Form Analysis
Part VIII: How to Deadlift Like a Powerlifter
Great video, Tom. Crystal clear. One editing note: the first line under “Selecting your Techniques” should read “how exactly should we…”
Thanks! On both counts. Fixed it.